
Pumpkin decorating ideas can be simple, stylish, and kid-friendly. You do not need carving tools to make pumpkins look great in your home.
This guide shares 10 looks you can copy, from hand-painted neutral pumpkins on an entryway console to white pumpkins with delicate gold leaf on a coffee table. Each idea includes easy steps and small styling tips.
You will also learn what supplies to use, where to place each pumpkin setup, and how to keep the look clean around real-life details like mail, charging cables, and snack cups.
Use these ideas to make photos that do well on Pinterest, then turn that click into a cozy room you enjoy all season.
1. Neutral Hand-Painted Pumpkins for an Entryway Console


For a modern family entryway, go for hand-painted neutral pumpkins in chalky beige and sage. This soft, muted palette works with wood floors, a woven basket below the console, and everyday items like a ceramic dish for keys and a small stack of mail. Keep the mood earthy and calm by choosing matte paint and leaving a little brush texture so it looks tactile and real.
Start with clean, dry pumpkins, real or foam. Paint two thin coats in beige and sage, letting the base show through in spots for a lived-in finish. Add subtle gold stems using a small craft brush, and keep the gold soft, not shiny. Place pumpkins in a loose cluster, then style around them with one plant for gentle wall shadows and one bench nearby with a slightly wrinkled throw to keep it relaxed.
How to style it: keep kid sneakers tucked under the bench and do not fight it. The mix of tidy and real life makes the entryway feel welcoming. If your console is narrow, use taller pumpkins in back and smaller ones in front. A small tray or dish helps corral clutter so the pumpkins still stand out.
- Use chalky beige, sage, and one warm wood tone as your main colors
- Choose matte acrylic paint for a soft, modern look
- Add a woven basket under the console for texture and storage
- Group pumpkins in odd numbers for a natural arrangement
- Keep one simple ceramic dish for keys so the surface stays clear
Pro Design Tip: Paint stems last and use a dry brush with a tiny amount of gold paint so the stem looks aged, not metallic and new.
Budget Considerations: Foam pumpkins cost more up front, but you can reuse them every year. For the lowest cost, buy real pumpkins and use leftover wall paint samples for the beige and sage base.


2. White Pumpkins with Gold Leaf on a Marble Coffee Table


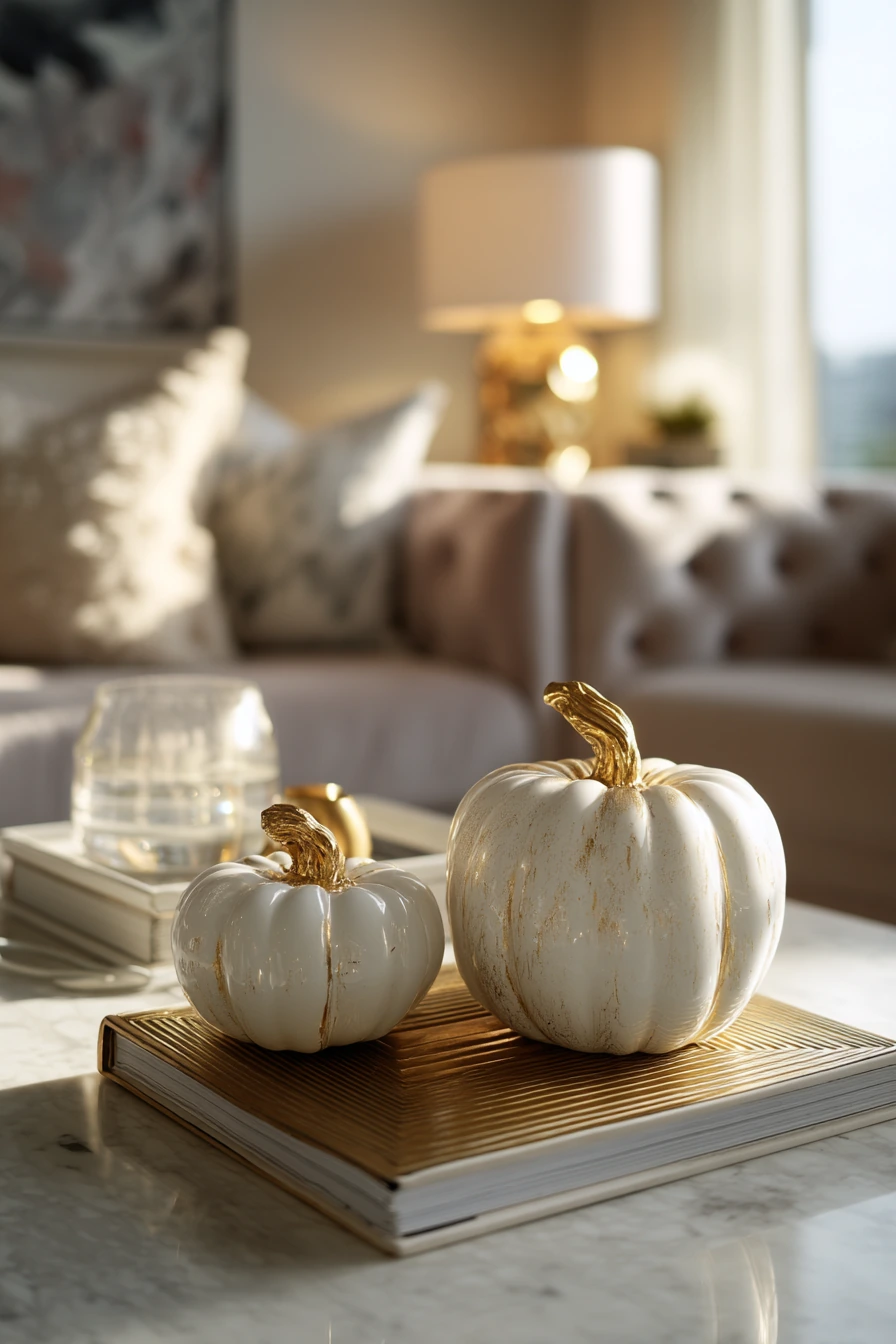
In a compact apartment living room, white pumpkins brushed with delicate gold leaf look polished without feeling fussy. The clean white works with a velvet sofa, and the small hits of gold tie in with the warm glow of a table lamp. This is a strong choice if your space already has refined materials like a marble coffee table, art books, and a simple water glass.
Use white pumpkins, real or faux, and add gold leaf to the ridges and stem area. Work in small sections with adhesive size, then press the leaf gently and brush away extra flakes. Keep the gold light, almost like it was dusted on. Place the pumpkins on a stack of art books to add height, then keep one everyday detail like a charging cable peeking near a cushion so the room still feels lived in.
How to style it: choose one tray or flat plate to keep the pumpkins from sliding on marble. Add one clear glass item for shine, like a water glass or small vase, and keep the rest soft with velvet and a warm lamp. If the table is small, use two pumpkins and one book stack instead of a large group.
- Pick matte white pumpkins so the gold stands out
- Use a small tray to protect marble and hold loose gold flakes
- Stack 2 to 3 art books to create a simple pedestal
- Keep lighting warm so the gold looks soft, not harsh
- Limit the palette to white, gold, and one deep sofa color
Pro Design Tip: Apply gold leaf only on high points and ridges so it reads as a highlight, not a full metallic pumpkin.
Budget Considerations: Gold leaf sheets can add up. For a cheaper option, use gold rub-on wax or a gold paint pen for similar detail with less waste.

3. Sticker and Googly Eye Pumpkins for a Busy Kitchen Island


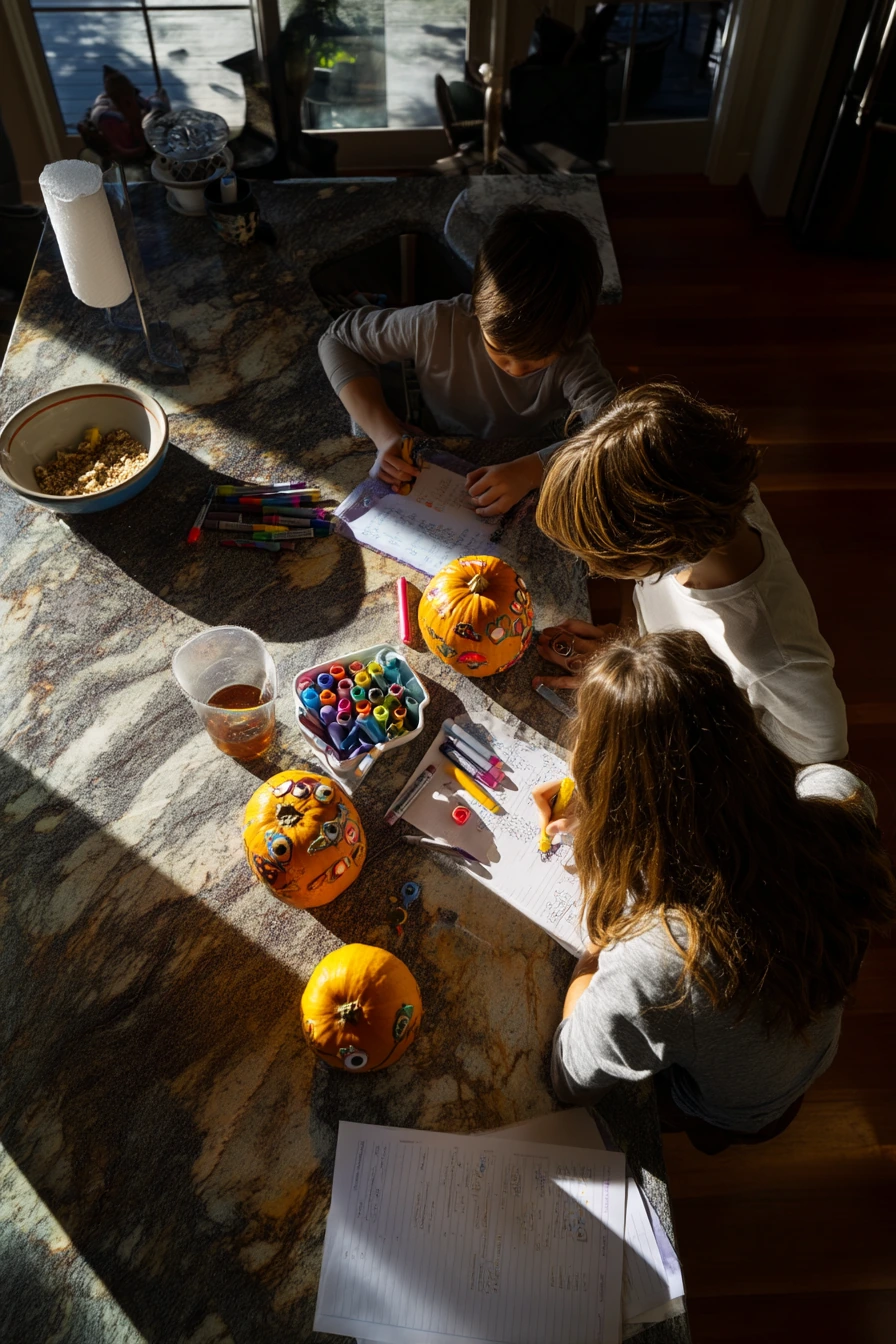
A busy kitchen island is the best place for kid-friendly pumpkin decorating ideas. Siblings can use stickers, googly eyes, and colorful markers for quick faces and silly characters. This is a no-carve plan that keeps the mood playful and bright, and it works well with natural morning light coming through a window.
Set up a simple craft zone: cover the island with kraft paper or a wipeable tablecloth. Put markers in a cup, sort stickers in a shallow bowl, and keep googly eyes in a small container so they do not roll away. Let kids work on smaller pumpkins so they can turn them easily. If you have real-life mess like a cereal bowl, a juice cup, or a crumpled homework sheet nearby, keep it on one side of the island so the decorating area stays clear.
How to style it: After the pumpkins dry, line them up on a tray or cutting board so they look intentional. Mix face styles, like one pumpkin with big eyes and one with a tiny smile. Take photos from slightly above to show the supplies, but clear away anything sticky before you store the pumpkins. If you want longer-lasting results, use craft glue dots for eyes instead of liquid glue.
- Protect the counter with kraft paper and tape the edges
- Use washable markers for easy cleanup
- Choose medium pumpkins so stickers fit well on the curve
- Keep snacks and homework to one side to reduce spills
- Seal finished pumpkins with a clear spray if using foam pumpkins
Pro Design Tip: Create a simple “face kit” for each kid with the same base items, then add one special sticker sheet so the designs feel unique.
Budget Considerations: Sticker packs and googly eyes are inexpensive at dollar stores. If you are saving money, use scrap paper shapes and tape instead of buying themed stickers.

4. Plaid and Linen Wrapped Pumpkins for a Rustic Dining Nook


Rustic dining nook pumpkin decorating ideas look best when they use fabric and texture. Wrap pumpkins in plaid and linen scraps, then tie twine bows for a homespun finish. This style pairs well with a stack of cookbooks, folded reading glasses, and warm golden hour light coming through sheer curtains.
Choose soft fabric with a little drape. Cut pieces large enough to wrap around the pumpkin and overlap at the bottom. Secure the fabric with straight pins for faux pumpkins, or use hot glue if you want it more permanent. Add twine around the top and tie a bow, then tuck the ends under. Keep vintage scissors nearby for photos and for trimming frayed edges.
How to style it: place the wrapped pumpkins on a small runner or a wood board to add another layer. Mix one plaid pumpkin with one solid linen pumpkin so the pattern does not take over. If you have a small table, keep the group low so it does not block conversation. A few loose fabric scraps in a shallow basket can make the nook feel cozy, but keep the pile neat.
- Use plaid for pattern and linen for a calm solid option
- Trim fabric edges with pinking shears to reduce fraying
- Choose twine in a natural color for a softer look
- Add one small stack of cookbooks as a styling anchor
- Keep the centerpiece low for easy dining and chatting
Pro Design Tip: Use a mix of fabric scales, like a large plaid and a tight weave linen, to create contrast without adding more colors.
Budget Considerations: This is a great scrap buster. Use old shirts, thrifted napkins, or leftover fabric from sewing projects instead of buying new yardage.


5. Black Line Art Pumpkins for a Modern Loft Shelf


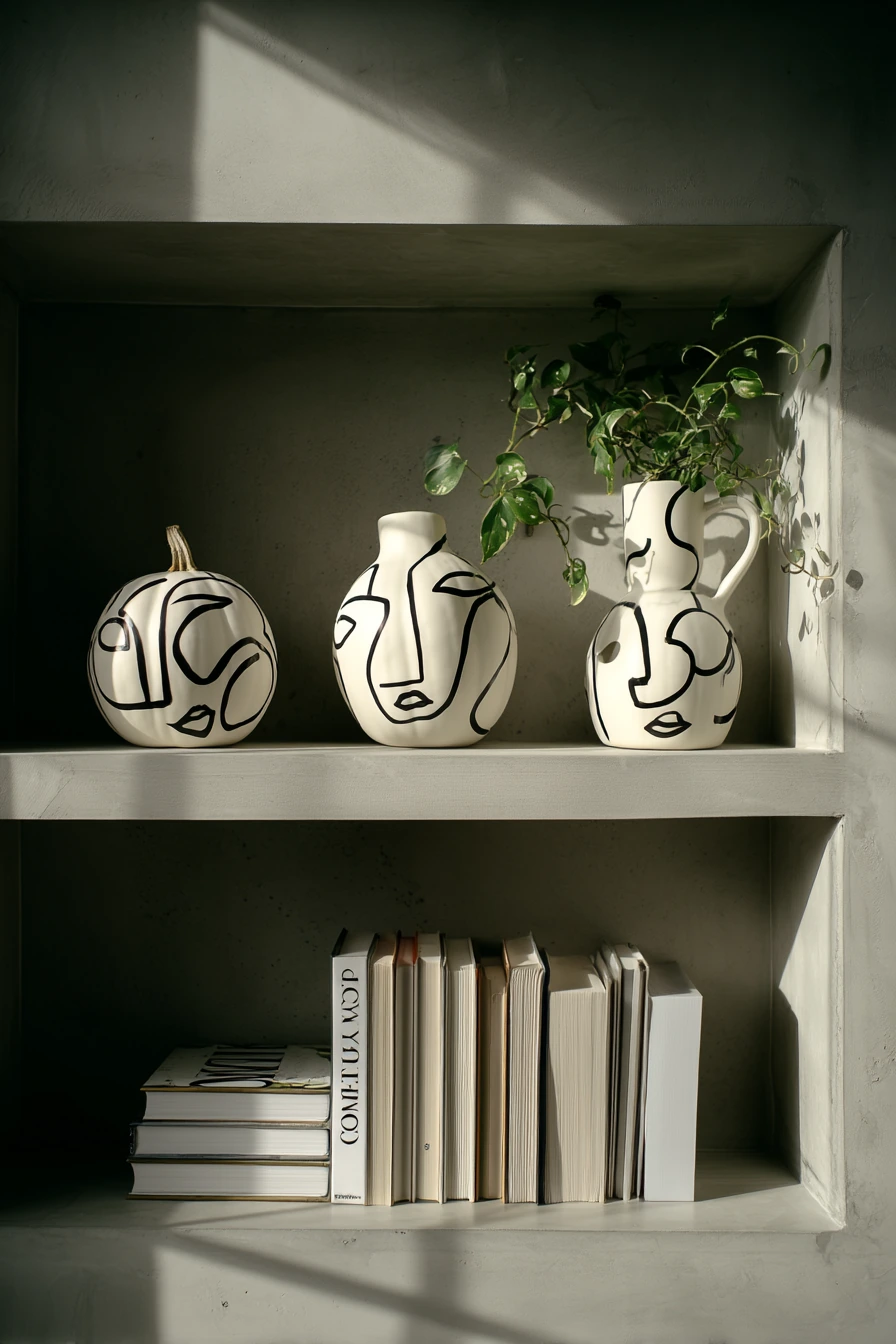
For an urban loft look, paint matte white pumpkins and add bold black line art. Abstract faces and simple shapes pop against a concrete wall backdrop and look crisp on a shelf with ceramic vases and a trailing plant. This idea is clean, graphic, and easy to customize.
Start with a matte white base coat. Once dry, sketch your design lightly with pencil, then trace with a black paint pen or a thin brush and acrylic paint. Keep lines confident and simple: one continuous face outline, closed eyes, or a few abstract curves. Place pumpkins next to neutral pottery so the black lines feel intentional, not busy. Add a paperback novel face-down to keep the shelf feeling lived in.
How to style it: limit the shelf to a tight color story, like white, black, and clay. Keep negative space between items so each pumpkin has room to show off the art. If you have a trailing plant, let it drape near the pumpkins to soften the straight lines. Use odd numbers, like three pumpkins across, and vary sizes for balance.
- Use matte paint so glare does not distract from the line art
- Pick one simple theme, like faces, shapes, or stripes
- Pair with ceramic vases in neutral tones
- Leave empty space on the shelf for a gallery feel
- Add one soft element, like a trailing plant, to balance the graphic look
Pro Design Tip: Repeat one line style across all pumpkins, like the same thickness and curve type, so the collection reads as a set.
Budget Considerations: Paint pens can be pricey, but they last a long time. A small bottle of black craft paint and a fine brush is cheaper and works the same with a steady hand.

6. Vintage Floral Decoupage Pumpkins for a Bedroom Dresser


Vintage floral decoupage is a soft, romantic way to decorate pumpkins, especially on a bedroom dresser. The faded flower prints look good with a perfume tray, a jewelry dish, and a slightly rumpled duvet in the background. This style feels calm and personal, and it is easy to match to your bedding colors.
Use paper napkins, tissue paper, or printed scrapbook sheets with delicate petals. Tear the paper edges instead of cutting them, so the seams blend better on the pumpkin curve. Brush decoupage medium on the pumpkin, press the paper gently, then add another thin coat on top. Work in small sections so the paper does not wrinkle. Choose a few large blooms and some smaller pieces to fill gaps.
How to style it: keep the dresser top simple. Use one tray for perfume, one dish for jewelry, and leave the rest clear so the pumpkins become the focus. Add one small candle or a simple bud vase if you want more height. Stick to nostalgic tones like dusty rose, cream, and soft green so the look stays quiet and cozy.
- Pick floral prints that match your bedding or curtains
- Tear paper edges so seams disappear more easily
- Use a soft brush to smooth bubbles without ripping the paper
- Let pumpkins dry fully before moving them to avoid fingerprints
- Style with a perfume tray and one small jewelry dish for a tidy look
Pro Design Tip: Seal with a matte top coat so the pumpkins look like printed fabric, not glossy craft paper.
Budget Considerations: Use thrifted floral books, leftover wrapping paper, or napkins you already have. Craft decoupage medium can be swapped for watered-down white glue in a pinch.


7. Geometric Painted Pumpkins for a Small Front Porch


Geometric pumpkin decorating ideas are perfect for a small front porch because they read well from the street. A couple can paint simple patterns like triangles, blocks, and angled stripes. Open paint jars, coffee mugs on the step, and a folded newspaper with wet brushes make the scene feel welcoming and real.
Choose two to three paint colors that match your porch, like black, cream, and one warm accent such as rust or olive. Use painter’s tape to create clean lines. Paint light colors first, let them dry, then tape and add the darker shapes. If the day is overcast, you will get soft, even light, which helps you see your lines and avoid harsh shadows. Keep a damp rag nearby for quick fixes.
How to style it: group the pumpkins near your door on one side so the walkway stays clear. Add a small doormat and one lantern or pot to frame the setup. Sprinkle a few real leaves on the floorboards, but keep it minimal so it does not look messy. If you want a taller look, set one pumpkin on an upside-down crate.
- Use painter’s tape for sharp, clean geometric edges
- Stick to 2 to 3 colors for a modern porch palette
- Place pumpkins in a cluster with different heights
- Keep coffee mugs and brushes on a tray for easy cleanup
- Seal with an outdoor clear coat if the porch gets damp
Pro Design Tip: Repeat one shape, like a triangle, across all pumpkins and vary the scale to make the group feel coordinated.
Budget Considerations: You can use leftover wall paint samples and a cheap foam brush. If you do not want to buy tape, cut cardboard stencils and hold them in place while you paint.


8. Cable-Knit Wrapped Pumpkins for a Cozy Reading Corner


For a hygge reading corner, wrap pumpkins in cream cable-knit sleeves. The chunky texture looks good next to a stack of novels, a knit blanket draped on an armchair, and a floor lamp casting an amber glow. This is a no-mess option that feels warm and soft for evening styling.
Use old sweaters, knit scarves, or cable-knit socks. Slide the knit over the pumpkin, then gather excess fabric at the bottom and secure it with rubber bands or twine. For faux pumpkins, you can hot glue the fabric inside the base to keep it tight. Keep the top opening clean so the stem shows, or replace the stem with a cinnamon stick for a cozy detail.
How to style it: place one knit pumpkin on a small side table with reading glasses resting open and two books stacked. Put another on the floor by the chair if you have space. Choose warm light bulbs so the cream knit looks rich, not gray. Keep your color palette simple: cream, tan, and one dark accent like a black lamp base or a deep brown book cover.
- Use cable-knit for texture that reads well in photos
- Secure fabric at the bottom so it stays smooth on top
- Pair with a knit blanket for a matched, cozy look
- Style with books and reading glasses to tell a simple story
- Use warm lamplight for a soft evening mood
Pro Design Tip: Add one smooth element, like a wood side table or a ceramic mug, so the knit texture does not overwhelm the corner.
Budget Considerations: Thrift stores are great for sweaters you can cut up. If you want the look for less, use inexpensive knit socks on mini pumpkins.


9. Chalkboard Message Pumpkins for a Family Kitchen Counter


Chalkboard-painted pumpkins are fun, useful, and easy to change all season. On a family kitchen counter, they fit right in with a grocery list clipped nearby, a wooden cutting board, an apple bowl, and a child’s drawing taped to the fridge. The handwritten fall messages add charm without adding clutter.
Paint the pumpkins with chalkboard paint and let them cure fully so the surface writes well. Season the chalkboard by rubbing chalk over the whole pumpkin, then wipe it off. After that, write messages like “apple day,” “soup night,” or a simple “hello fall.” Use a chalk marker for clean lettering, or classic chalk for a softer look. Keep a small cloth nearby to erase and rewrite.
How to style it: keep pumpkins near the backsplash so they do not get knocked over during meal prep. Use one larger pumpkin for the main message and two small ones for short words or simple doodles. If you have bright midday light, place the pumpkins where the shadows look crisp but not harsh. Add one wood element, like a cutting board, to warm up the black surface.
- Let chalkboard paint cure so it does not smudge
- Season the surface before writing your first message
- Write short phrases that match your weekly plans
- Keep pumpkins toward the back of the counter for safety
- Pair with wood and fruit for a natural kitchen look
Pro Design Tip: Use one lettering style across all pumpkins, like simple block letters, so the display looks neat even with different messages.
Budget Considerations: A small can of chalkboard paint covers several pumpkins. If you are saving money, buy one can and paint only the front half of each pumpkin.


10. Succulent Pumpkin Centerpiece for an Organic Dining Table


A succulent pumpkin centerpiece is a beautiful option for a dining table because it looks sculptural and natural. You hollow out a pumpkin and crown it with succulents and moss, then style it with loosely folded linen napkins, stacked ceramic plates, and simple brass candle holders. The earthy palette works well in warm late afternoon sun.
Pick a squat pumpkin with a stable base. Cut a circle at the top and scoop out the inside. Add a plastic liner or a small bowl inside to protect the pumpkin from moisture. Fill with floral foam or a shallow layer of soil, then tuck in succulents. Add moss to cover gaps and create a finished look. Keep the plants snug so they hold their shape during meals.
How to style it: keep the centerpiece low and wide so guests can see each other. Use linen napkins in a neutral tone and do not overfold them, since the relaxed look matches the organic centerpiece. Add two or three candles, but keep them short so they do not block the view. A half-full water glass and stacked plates help the table feel real and ready to use.
- Choose a wide pumpkin so the arrangement stays stable
- Use a liner to reduce leaks and mess on the table
- Mix 3 to 5 succulent types for varied shapes
- Finish with moss for a full, natural surface
- Keep the centerpiece low for easy conversation
Pro Design Tip: Repeat one succulent color, like blue-green, in at least three spots so the arrangement looks balanced from every seat.
Budget Considerations: Buy small succulents and split them into cuttings to fill more space. You can also reuse faux succulents and craft moss for a centerpiece that stores well.


These common questions help you get cleaner paint lines, longer-lasting pumpkins, and better-looking photos. Most of the ideas in this post are no-carve, so they are safer for families and easier for small spaces.
Use the answers below when you are choosing real vs. faux pumpkins, picking sealers, or planning where the decor will sit. Small changes, like using a tray on a marble coffee table or curing chalkboard paint, make a big difference.
Frequently Asked Questions
1. Should I use real or artificial (foam) pumpkins?
- Real Pumpkins: Best for a fresh, organic look and are budget-friendly if you buy standard grocery store pumpkins. However, they rot eventually. If painting them, ensure they are completely clean and dry so the paint adheres properly.
- Foam Pumpkins: Best if you want to reuse your decor year after year. They are lightweight, won’t rot, and are easier to drill into or hot-glue fabric and moss to.
2. How do I get clean paint lines on geometric or striped pumpkins?
Use low-tack blue painter’s tape. Apply the tape firmly to the pumpkin, press down on the edges to prevent bleeding, and paint your light colors first. Let them dry completely before applying tape over them for darker shapes. Always peel the tape off gently while the final coat is slightly damp to prevent peeling the paint.
3. How can I keep chalkboard-painted pumpkins from smudging?
Let the chalkboard paint cure fully (usually 24 hours) before writing on it. Before your first real message, “season” the surface by rubbing the side of a piece of chalk all over the pumpkin and wiping it off with a dry cloth. This prevents ghosting and makes writing and erasing much smoother.
4. How do I prevent a succulent pumpkin centerpiece from rotting?
When carving out a pumpkin for live plants, line the inside with a small plastic bowl or plastic wrap before adding your floral foam, soil, or moss. This creates a barrier so moisture from watering the succulents doesn’t cause the pumpkin walls to break down prematurely.
5. What is the easiest way to secure fabric or knit sleeves to no-carve pumpkins?
For foam pumpkins, you can use straight pins or a dab of hot glue at the base to hold fabric tight. For stretchy items like cable-knit socks or sweaters, simply slide the sleeve over the pumpkin, gather the excess fabric neatly at the bottom, and secure it tightly with heavy-duty rubber bands or natural twine.
6. How do I stop small pumpkins from sliding around on smooth surfaces like marble or glass?
Place your pumpkin arrangements on a small tray, a shallow ceramic plate, or a stack of books. Not only does this anchor the look and protect delicate furniture from moisture or loose glitter/gold leaf, but it also keeps lightweight pumpkins from rolling around.